Showing posts with label Game Development. Show all posts

Adding Events To Player (Part 6)

Adding Events To Player (Part 6)

Welcome once again guys ! So we have added behaviors to our player in last tutorial and if you guys miss that tutorial (then click here) , and if do not miss that tutorial then you are good to go. So now we are going to add some controls (Events) to our player so that player can look at the mouse position and also giving ability to our player to shoot. So let’s get started.
Adding Events To Player

You guys will see an “Event tab (Event sheet 1)” right after to "layout 1" tab (If you don’t see it then simply click on “Event Sheet 1” at the right side).  Once you open “Event Sheet”, you will a blank window which is actually “Event Sheet”. For adding events click on “add event” or simply double click in “Event Sheet”. Now you will see a pop-up window which will have different images as well as “System”.

Adding Events To Player (Part 6)

Click on “System” and then click on “Next”, now you will see many “Events”. Click in search bar and type “Every tick”, before we move to next event let me explain what is “Every tick”. Every tick is just a milliseconds of one second. It means 60 milliseconds per-frame. 
Adding Events To Player
Adding Events To Player (Part 6)
Finally click on "Done". Before we do any thing else, first of all go back to level 1 tab and right click any where, and click  on “add new object “.  This time click on search bar and type “Mouse”. Add mouse and wait for 5 seconds, once you done with that, now you are good to go.
Adding Events To Player (Part 6)
Add action
Once you add “Every tick”, then you will see “add action” right after to the “System>Every tick” or see above image. Now click on “add action” and you will see new pop-up window (again). This time click on player and then click on “Next”, now click on search bar and search for “Set angle towards position”. Select that and click on “Next”, here you will a new window having x-axis and y-axis parameters. Add “Mouse.X” and “Mouse.Y” without quotes in X and Y parameters respectively. And now run your game, you will see our player is looking at mouse position properly. So Congratulation guys our player is going on the right spot.
So that’s it for this tutorial and if you have any question please leave your comment without any kind of hesitation.

Adding Behaviors part 5

Adding Behaviors part 5
Adding Behaviors

Welcome guys ! So in the last tutorial i show methods of adding sprites in our game. And now i am going to adding some behaviors to our sprites. Before we add some behaviors, let me explain what the heck is behavior? It is very simple, a behavior is a reaction of sprites in the game. So construct 2 or C2 is providing many built in behaviors. They are used in different situation. It depends on your game. But i am going to show you method of adding behavior to our "Player" and "Monsters/Enemies".

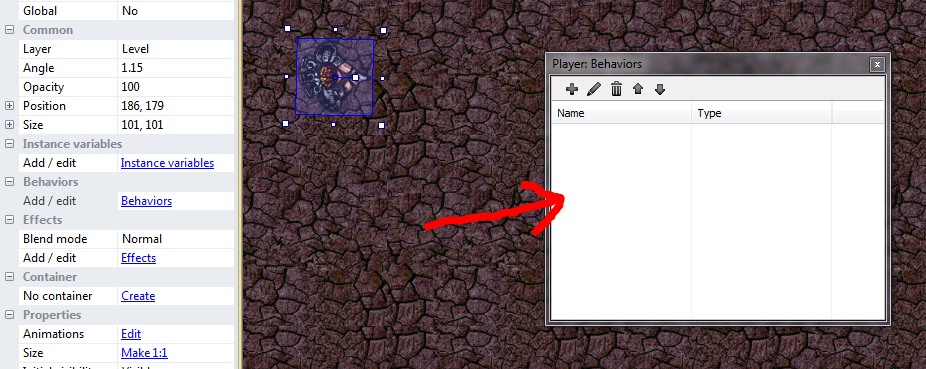
First of all you have to select "Player" and then you will see some properties of your player on left side (Properties panel). And here is an image for help.
Adding Behaviors part 5
Properties
Now you will see a pop-up window with nothing to see. i.e
Adding Behaviors part 5

Click on "plus icon" as shown in image below.
Adding Behaviors part 5

Now you will see another pop-up window with many behaviors. Click on search bar at the top left corner of Behavior window and type for "8 Direction". Now select "8 Direction" behavior and click on "Add" button.
Adding Behaviors part 5

Adding Behaviors part 5

Now click again on "Plus" icon as shown in above image and now type  "Bound to layout" in search bar. Click on "Bound to layout" and then click on "Add" button. Again click on "Plus" icon, now type "" in search bar "Scroll to". Same again click on "Scroll to" and then click on "Add" button. And now close all pop-up windows.
Adding Behaviors part 5

Click on "Play" button, which is present (See above image) in top left corner of construct 2 or C2. And press "Arrow Keys" on Keyboard, you will see your player is moving. So congratulation your player is now reacting on pressing keyboard arrow keys. And if you guys have any question please leave your comment. And don't forget to subscribe.

Click here to see video.

See video:


Adding Sprites (Part 4)

Adding Sprites (Part 4)

So as we locked our background layer in last tutorial and our is looking too much boring (nothing to do. :-) ) but now we going to adding our "Player" and some "Enemies". So before we add let me explain one term here which called "Sprites". You guys may thinking about Sprites and your mind will say to you that what Sprites or Sprite exactly is ? Oh so here is the answer Sprites are every thing in your game instead of your background image. May be some other people explain it differently but i call every thing as sprites (Sprites could be your player,enemies etc). I have some images below, download these images.

Adding Sprites (Part 4)
Player

Adding Sprites (Part 4)
Bullet

Adding Sprites (Part 4)
Monster
Once you download these images you are good to go. So now before we add sprites make shower you have selected new layer which is in this case "Layer 0" (How to add layer), and now double click any where in your scene (Level 1), you will see new popup window and click in search area, search for "Sprites". Select sprite and click on insert button, you will see a selection window will popup. Select our cool and nice player where you save it. And now on the left side in C2 you will see player properties and if you don't see it then select your player first. We are now changing Name from sprite to Player which is at the very top of properties panel.
Adding Sprites (Part 4)
So from now i will teach you guys in video tutorial. Stay tune and if you guys have any question please leave your comment and Yeah don't forget to subscribe. Thanks and have a good day.

See in Video:

Setting Up Background Image (Part 3)

Setting Up Background Image (Part 3)
All right, so now as we have added background image (Click here if you miss last tutorial) into our first level. And the image is quit small and we want to setup image into a complete level. Well this is quit easy to setup you background image, select your image and now you will see properties of you image on left side in Construct 2. So go ahead and find "Position" value of image, under "Position values" you guys will also see "size values" of image.
Setting Up Background Image (Part 3)

Actually these are X and Y coordinates of image (which is background image), now change the both position and size values as shown in above image. And you will the kind of changing in your background image. So the image is now covering complete Scene of our game. This is the time to setup some other things which will help you in future. OK so look at the right side of C2 or Construct 2 you will see this
Setting Up Background Image (Part 3)

Select "Layers" tab as shown in above image and now you will see "Layer 0"  which is already selected for you by C2 or Construct 2. Right click on "Layer 0" and rename it as "Background" then press "Enter Key or Return Key" on your Keyboard. This is the to add new layer, now you will ask yourself that how to add new layer in C2 or Construct 2. Ohhh don't you worry about that its quit simple and easy, so while selected layers tab you will see some icons above layers tab i.e

So go ahead and click on "plus" icon and you will see new layer and rename that layer. So now select again background layer and you will "Lock" icon in-front of "Background Layer", click on Lock icon and this layer is Locked. I think this is enough for this tutorial and one another thing is i am going to make video tutorials in Urdu Language on Construct 2 and if you guys cannot understand my articles properly let me know, then i will work hard in make video tutorials. For more updates please subscribe. Thanks

Adding Background Image (Part 2)

Adding Background Image
Welcome to Second part of our first game development in C2 or Construct 2. If you guys did not read my first tutorial on C2 or Construct 2 then click here and if you are done with that tutorial then you guys are good to go. So now i am going to show you how to add background image in Construct 2 or C2.

First of all double click any where in Scene view and you will see a new popup window which will be look like this
Adding Background Image
Since I am using older version of Construct 2 or C2 that's the reason of icon will be different for your's icon shown in popup window. Well as I made a red circle around an Icon which is called "Tiled Background", which is located under "General". There is another way of selecting "Tiled Background", all you need to do is click in search in popup window and type "Tiled Background". So once you guys get it then click on "Tiled Background" and then click on "Insert".
Click here to see video tutorial.

Once you "click on insert button" you will see your cursor changed to a "plus sign" which is called "Cross-Hair". So now click in white area (which is Scene in this case) in C2 or Construct 2, now you will see a new popup window then click on load icon as shown in image below.

 And you are ready to select an image from you computer. I hope you guys are also using the same image which i have providing in my first tutorial. Select image and then click on "open" in popup window. Once you click on "open button" an image will appear in your Scene. Well image will look to much small but your game level is quit big. So we will adjust this image in next tutorial and if you guys have any question then leave your comment below. Thanks

See in Video:

First Game In Construct 2 (Part 1)

First Game In Construct 2

First Game In Construct 2

Before we get started to develop our first 2d game which is "top down shooter", Ahh not get worry about that i am just giving name to our first game. If you guys did not download C2 then click here and if you guys are done with downloading and install construct 2 then you guys are good to go.

First of all when you open construct 2 you will see this
First Game in Construct 2
Its just an interface which is provided by construct 2.  All you need to do is go to the "file menu" as shown in image below then click on "New".
Once you click on "New" then you guys will see a popup menu which will allow you guys to select your first game level Scene. Which i call as new project selector.

First Game in Construct 2
As this is your first to see this popup menu or new project selector, simply click on "New empty Project". Once click on "New empty project" you will see a complete white or blank Scene. Now this is your game level. And what i am going to do is i want to add a new background image to my level and image is given below.
First Game in Construct 2
Download above image because we will use this image, and I think this is enough for this tutorial and we will continue from next tutorial. And if you have any question leave your comment.

How to Install Construct 2

How to install Construct 2

How to Install Construct 2:

Hello everyone ! So once you guys download construct 2 then you are ready to move to the next step which is the installation part. Installation of construct 2 is quit simple. Here are few steps for installation of construct 2:
  1. Double click on setup which you guys downloaded.
  2. Wait for a moment until the confirmation box is appear (For windows 7 and up)
  3. So now click on next button
  4. Repeat third point
  5. And before finish make sure you guys check on Check graphic "checkbox", this will let you now about your PC graphics
  6. Once OK message is appear 
  7. You are done with installation

If you guys have any question about installation please leave your comment Thanks

So now you guys are ready to move to next tutorial which is beginners tutorial. Click here